Get Started in Minutes
Boot an Ubuntu Live USB, run one command, and your whole LAN has traffic shaping and multi-hop VPN. Nothing persists until you decide to install.
Once Ubuntu is running, the bootstrap takes seconds. Add your VPN credentials, deploy a circuit, and you are online through the VPN. In my testing, I can go from a fresh Ubuntu boot to VPN-protected traffic in under two minutes.
Before running the bootstrap, you may want to review the trust model to understand what Wirebump can see and how to verify it.
Hardware Requirements
Wirebump runs on hardware you probably already have. Old laptops, mini PCs, or whatever is collecting dust in a closet.
What we’ve tested: An Intel i5-8250U (8th gen, circa 2017) with 8GB RAM pushes gigabit speeds through multi-provider, multi-hop circuits with post-quantum encryption on every layer.
What you actually need: Depends on your setup. Each encryption layer adds CPU overhead, so simpler configurations need less power:
- Traffic shaping only: Very light. Almost anything will work.
- Single VPN provider: Moderate. Most old laptops handle this fine.
- Multi-hop or multi-provider: More demanding, but you could get by with less than our test hardware if you don’t need full line rate.
NICs: You need two network interfaces. Most machines have one built-in ethernet port. Add a USB-to-gigabit ethernet adapter for $10-15 from any electronics store.
Note for low-power hardware: Skip Mullvad VPN’s advanced options (DAITA, LWO, QUIC) if you’re running on minimal specs. These features require extra memory and compute that may prevent circuits from deploying.
Option A: Ubuntu Live USB (Recommended First Step)
Test Wirebump without committing to anything. Boot from USB, try it out, and power off. Your machine stays untouched.
-
Create an Ubuntu 25.10 live USB and boot from it (other versions may work, but 25.10 is what I test on)
-
Download and run bootstrap:
curl -fsSLO https://wirebump.net/wirebump-linux-amd64 \
  && chmod +x wirebump-linux-amd64 \
  && sudo ./wirebump-linux-amd64 bootstrap
By downloading, you agree to the Wirebump License.
-
Confirm your upstream NIC (to modem/ISP) and downstream NIC (to your router/devices) are detected correctly, or remap them
How to tell which is which: Your upstream NIC is usually the one that already has an IP address from your ISP. The downstream one typically has no IP yet. If you are using a USB ethernet adapter on a laptop, you will see which interface is the USB one. If you get it wrong, connect to the other port to reach the admin interface, then fix it on the settings page.
-
Bootstrap completes in seconds, depending on your hardware and internet speed
-
Open the web UI at the IP address displayed in the terminal
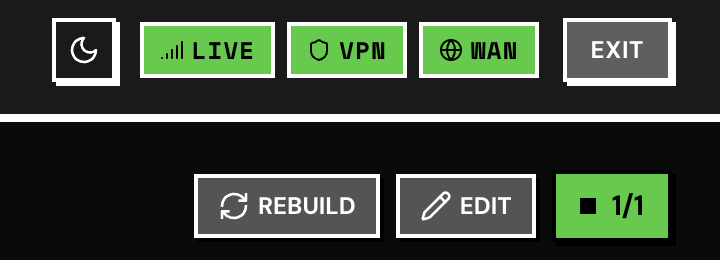
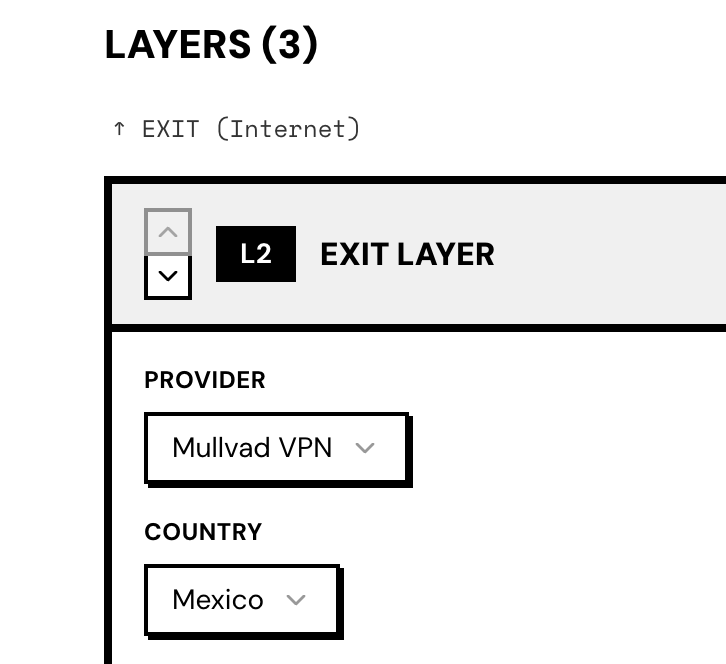
From there, enable traffic shaping or add your Mullvad VPN or Proton VPN accounts and deploy circuits.
Nothing persists from the live USB. Any circuits you create, any VPN accounts you save, they all vanish when you power off. That is the point. Experiment freely.
Lower-risk testing: Connect Wirebump’s upstream to your existing router’s LAN port instead of directly to your modem. Wirebump will get an internal IP and still provide DHCP downstream. You can connect a spare machine or router to test without affecting your main network.
Option B: VM Testing
For exploring the UI and VPN circuits without touching physical network topology.
- Create an Ubuntu 25.10 Desktop VM with two network interfaces:
- One interface connected to the internet (upstream)
- One interface for internal/downstream (can be disconnected)
- Install Wirebump using the same steps as Option A
- Open
http://localhostin a browser inside the VM - Load your Proton VPN or Mullvad VPN accounts and deploy circuits
- Run speed tests or IP location checks from the VM’s browser
VM testing works well for learning the interface and testing VPN circuit configurations. It is not suitable for traffic shaping testing since that requires real network traffic between physical interfaces.
Option C: Permanent Install
Once you have tested with the Live USB and decided Wirebump fits your setup:
- Boot the Ubuntu 25.10 Live USB
- Launch the Ubuntu installer and install to your dedicated machine
- Boot into your fresh Ubuntu installation
- Run the same Wirebump setup steps from Option A
Remember: nothing persists from the live USB to the installed system. You will repeat the Wirebump bootstrap after installation.
If Things Go Wrong
This is early software. Have a recovery plan.
From the Wirebump interface:
- Disable VPN: One click from the header puts Wirebump into pass-through mode. Traffic flows directly to your ISP while you troubleshoot.
- Redeploy circuit: One click rebuilds your VPN tunnels. This is the most common fix.
- Rescue mode: On the settings page, this runs a partial bootstrap and deactivates the VPN.
From the command line:
- Rerun the bootstrap command to reset everything
- Or wipe clean and start fresh. From a live USB, I can go from a clean Ubuntu boot to online through the VPN in under two minutes.
Physical bypass: Unplug the cable from your upstream modem, skip Wirebump, and plug directly into your router. You are back to your pre-Wirebump setup in seconds.
Verify your connection: Services like whatismyipaddress.com will show you where your traffic is exiting.
What You Can Do Next
Once Wirebump is running:
- Configure Traffic Shaping to eliminate bufferbloat and keep video calls smooth
- Connect your VPN accounts from Mullvad VPN or Proton VPN
- Build and deploy circuits with multi-hop, multi-provider configurations